
When it comes to contacting a large number of leads, having the right infrastructure is just as crucial as the email copy, target audience, and your offer. Without a robust infrastructure, you risk either not being able to send enough emails or ending up in the spam folder after just a few weeks of your campaign.
One of the biggest mistakes companies make is using their primary domain for cold emailing. This is risky because it can lead to the domain being blacklisted, which could cause emails to end up in the SPAM folders of team members or clients. To avoid this risk, we need to buy new domains based on the volume of emails we plan to send.
The setup process will be divided into four parts:
- Domain creation
- Email account creation
- DNS setup
- Smartlead setup (email sending software)
Domain Creation
For this example, we want to contact 5,000 new leads every month (250 per day). To achieve this, we will purchase 12 domains similar to our main domain and create 3 email addresses under each domain, resulting in a total of 36 email addresses.

It’s crucial to only buy ‘.com’ domains, as these have the best deliverability and are trusted internationally. The easiest place to buy these domains is Cloudflare.
If your primary domain is companybusiness.com, consider purchasing domains like:
-
- company-business.com
- getcompanybusiness.com
- trycompanybusiness.com
- gocompanybusiness.com
- meet-companybusiness.com
Other prefix and suffix ideas include:
- see
- use
- now
- hey
Email Account Creation
Next, we need to create email accounts using Google Workspace and Microsoft 365 Business accounts. We advise splitting the domains between these two providers to enhance deliverability, as emails sent from Google Workspace are more likely to land in Gmail inboxes, and emails from Microsoft 365 are more likely to land in Outlook inboxes (instead of the SPAM folders).
The email-sending software we will be using can recognize the email provider (Google, Microsoft, or others) of the recipient before sending. This allows the software to prioritize sending from a corresponding provider, improving the chances of landing in the inbox.
You can create your accounts using the links below:
The setup process for these accounts is well-documented, and there are plenty of tutorials available on YouTube. Given that this step is time-consuming, it might be best to outsource it. Once the accounts are created, proceed to set up the DNS for your domains.
You can also use resellers so you don’t need to do everything manually. (Feel free to email us, and we will share some resellers with you.
DNS Setup
The following DNS setup is for Google Workspace only. If you are using Microsoft 365 or another email provider, the setup will be slightly different. The final setup will look like the screenshot below, but we will configure each step together.
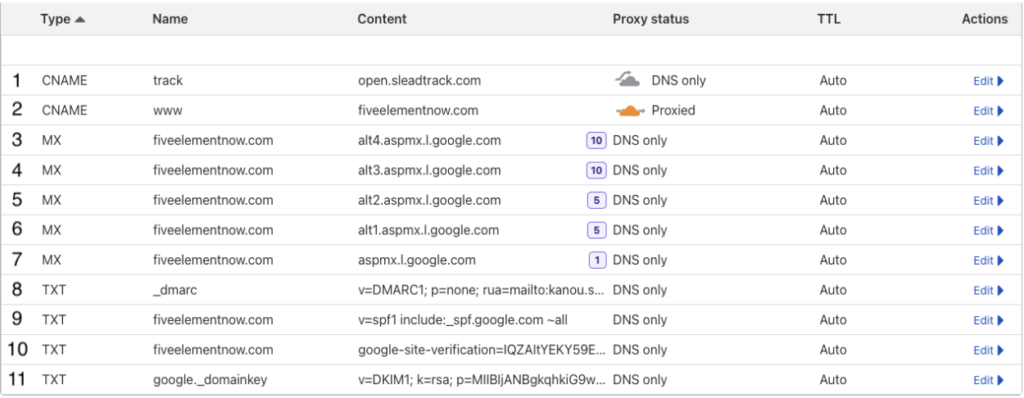
Your DNS settings should be configured as follows:
1. Tracking Domain
- Type: CNAME
- Name: track
- Content: open.sleadtrack.com
- Proxy status: DNS only
- Explanation: This sets up a tracking domain for your email-sending software to monitor opens and clicks.
2. CNAME for WWW
- Type: CNAME
- Name: www
- Content: yourdomain.com
- Proxy status: Proxied
- Explanation: This ensures that www.yourdomain.com redirects to yourdomain.com.
3. Mail Exchange Record 1
- Type: MX
- Name: yourdomain.com
- Content: alt4.aspmx.l.google.com
- Proxy status: DNS only
- Priority: 10
4. Mail Exchange Record 2
- Type: MX
- Name: yourdomain.com
- Content: alt3.aspmx.l.google.com
- Proxy status: DNS only
- Priority: 10
5. Mail Exchange Record 3
- Type: MX
- Name: yourdomain.com
- Content: alt2.aspmx.l.google.com
- Proxy status: DNS only
- Priority: 5
6. Mail Exchange Record 4
- Type: MX
- Name: yourdomain.com
- Content: alt1.aspmx.l.google.com
- Proxy status: DNS only
- Priority: 5
7. Primary Mail Exchange Record
- Type: MX
- Name: yourdomain.com
- Content: aspmx.l.google.com
- Proxy status: DNS only
- Priority: 1
8. DMARC Record
- Type: TXT
- Name: _dmarc
- Content: v=DMARC1; p=none; rua=mailto:yourname@yourdomain.com
- Proxy status: DNS only
- Explanation: This sets up DMARC (Domain-based Message Authentication, Reporting, and Conformance) to manage email authentication policies and receive reports. Replace yourname@yourdomain.com with an email address you own for receiving DMARC reports.
9. SPF Record
- Type: TXT
- Name: yourdomain.com
- Content: v=spf1 include:_spf.google.com ~all
- Proxy status: DNS only
- Explanation: This is an SPF (Sender Policy Framework) record that allows Google servers to send emails on behalf of your domain.
10. Google Site Verification
- Type: TXT
- Name: yourdomain.com
- Content: google-site-verification=(your verification code)
- Proxy status: DNS only
- Explanation: This is a Google site verification record used to verify domain ownership for Google services. When you created your Google Workspace, this was one of the steps. Google guided you through this, so it should already be set up.
11. DKIM Record
- Type: TXT
- Name: google._domainkey
- Content: v=DKIM1; k=rsa; p=(your DKIM key)
- Proxy status: DNS onlyExplanation: This is a DKIM (DomainKeys Identified Mail) record that adds a digital signature to your emails to verify that they haven’t been altered.
In your Google Admin, type DKIM in the search bar and click on the first result: ‘DKIM authentication’. Add the record that is shown and click on Start Authentication.
Smartlead Setup
 Now we need to set up the email sending software. We recommend using Smartlead as it’s currently the best tool for cold emailing.
- Create an Account. Sign up for Smartlead and add your 36 email addresses. They provide guides on how to do this in bulk, but you can also add them one by one. If you’re using a reseller, he will do it for you.
- Configure your Email Addresses. Select all your email addresses and click on ‘Bulk Update’. Configure the following settings:
- General Settings:
- Messages per day: 35 to 40
- Signature: Add your signature
- Custom Tracking Domain: track.yourdomain.com (replace yourdomain.com with your actual domain). The DNS record has been added earlier in the DNS setup.
- Warm Up:
- Bulk Update Warm-up Status: Active
- Total Number of Warm-up Emails per Day: 20-30
- Bulk Update Daily Ramp-up: 2
- Reply Rate: 35%
- Custom Warm-up Identifier Tag: (choose a tag)
- Bulk Update Auto-adjust Warm-up/Sending Ratio: Enable
Your email addresses are now warming up. We recommend not sending any emails other than the warm-up emails for 2 weeks. After this period, keep the warm-up activated.
NOTE: We aim to contact 10 new leads per day per email address. To reach 250 new leads per day, you will need to include 25 inboxes in the campaign. In our example, we created 36 inboxes because we always keep 30% of the inboxes in warm-up mode. We rotate every 2 weeks.
After 2 weeks, the inboxes that were in warm-up will be added to the campaign, and we will disconnect 30% of the currently active inboxes, preferably those with decreased reputations.
Happy emailing!😊
_________________
If you have any questions or need further assistance, don’t hesitate to reach out. We are here to help you achieve your goals and transform your outreach efforts. You can book a call using this link – Book a Call