Triple Your Email Campaign Results: Master A/B Testing

Triple Your Email Campaign Results: Master A/B Testing

Cold email campaigns can be a powerful tool for generating consistent appointments and driving business growth. However, transforming an underperforming campaign into a successful campaign requires a strategic approach. 

This article is divided into three parts:

  1. The 3 Levels of A/B Testing
  2. How to Analyze Your Stats
  3. Practical Examples for Conducting Effective Testing

Three Levels of Testing

Not all tests are created equal. There are three crucial levels of testing, each varying in the potential impact they can have on your campaign’s success. We recommend starting with Level 3, before moving on to Levels 2 and 1, to maximize your campaign’s effectiveness.

Level 3: Potential to Increase Campaign Results by 100% to 400%

At this stage, you’re testing fundamental aspects of your campaign.

Market: Evaluate your industry and country.
Offer: Assess what you offer. Is it something people want or need? How is the offer positioned within the market?
Sophistication: How mature is the market? See below the 5 levels of sophistication.
Awareness: Understand your target audience’s awareness of the problem and the solution you offer.

Level 2: Potential to Increase Campaign Results by 30% to 100%

At this intermediate level, you refine your campaign by addressing the following:

Case Study: Use relevant case studies for credibility.
First Line: Does it capture attention and create interest?
Targeting: Determine company size and job titles in your audience.
Strategy: Personalized Loom, AI-generated copy, direct call requests, etc.
Lead Source: Identify lead sources like Apollo, Store Leads, Crunch Base, etc.

Level 1: Potential to Increase Campaign Results by 10% to 20%

The final level of testing involves fine-tuning the following elements:

CTA: Review the effectiveness of your CTA. Is it compelling enough to prompt action?
P.S. Line: Make sure your P.S. line reinforces your message and provides additional incentive for the reader to take action.
Follow-ups: Follow-up process. Is it timely and engaging? Does it effectively reinforce your initial message?

How to Analyze Your Stats

Volume before Analysis: Ensure you have a significant sample size before analyzing your results. Contact at least 300 leads per test to gather meaningful data.

To measure the success of your A/B testing, focus on two key metrics:

Positive Reply Rate: The percentage of leads who respond positively to your campaign.
Appointment Booking Rate: The percentage of leads who book an appointment after the initial contact.

Analyzing cold email data is more straightforward compared to platforms like Facebook Ads, where numerous metrics are available for analysis. Here, we focus on these two primary metrics, which simplifies the data analysis process but can also complicate optimization.

With fewer metrics, pinpointing the exact changes needed for improvement can be more challenging.

In conclusion, optimizing your cold email campaign requires a strategic approach through structured A/B testing. Start with high-impact Level 3 tests to assess your market, offer, sophistication, and audience awareness. Progress to Level 2 to refine your case studies, engagement lines, targeting, and lead sources. Finally, fine-tune Level 1 elements like your CTA, P.S. lines, and follow-up processes.

Focus on key metrics like positive reply rates and appointment booking rates, ensuring a substantial sample size for meaningful analysis. By following these steps, you can transform your campaign’s performance and drive business growth.

Happy emailing!

——

If you have any questions or need further assistance, don’t hesitate to reach out. We are here to help you achieve your goals and transform your outreach efforts. You can book a call using this link – Book a Call

Scale Your Corporate Training Business: Contact 5,000 Companies Monthly

Scale Your Corporate Training Business: Contact 5,000 Companies Monthly

When it comes to contacting a large number of leads, having the right infrastructure is just as crucial as the email copy, target audience, and your offer. Without a robust infrastructure, you risk either not being able to send enough emails or ending up in the spam folder after just a few weeks of your campaign.


One of the biggest mistakes companies make is using their primary domain for cold emailing. This is risky because it can lead to the domain being blacklisted, which could cause emails to end up in the SPAM folders of team members or clients. To avoid this risk, we need to buy new domains based on the volume of emails we plan to send.


The setup process will be divided into four parts:

    1. Domain creation
    2. Email account creation
    3. DNS setup
    4. Smartlead setup (email sending software)


For this example, we want to contact 5,000 new leads every month (250 per day). To achieve this, we will purchase 12 domains similar to our main domain and create 3 email addresses under each domain, resulting in a total of 36 email addresses.


It’s crucial to only buy ‘.com’ domains, as these have the best deliverability and are trusted internationally. The easiest place to buy these domains is Cloudflare.


If your primary domain is companybusiness.com, consider purchasing domains like:

    • company-business.com
    • getcompanybusiness.com
    • trycompanybusiness.com
    • gocompanybusiness.com
    • meet-companybusiness.com

Other prefix and suffix ideas include:

    • see
    • use
    • now
    • hey


Next, we need to create email accounts using Google Workspace and Microsoft 365 Business accounts. We advise splitting the domains between these two providers to enhance deliverability, as emails sent from Google Workspace are more likely to land in Gmail inboxes, and emails from Microsoft 365 are more likely to land in Outlook inboxes (instead of the SPAM folders).

The email-sending software we will be using can recognize the email provider (Google, Microsoft, or others) of the recipient before sending. This allows the software to prioritize sending from a corresponding provider, improving the chances of landing in the inbox.


You can create your accounts using the links below:

Google Workspace


Microsoft 365 Business


The setup process for these accounts is well-documented, and there are plenty of tutorials available on YouTube. Given that this step is time-consuming, it might be best to outsource it. Once the accounts are created, proceed to set up the DNS for your domains.

You can also use resellers so you don’t need to do everything manually. (Feel free to email us, and we will share some resellers with you.


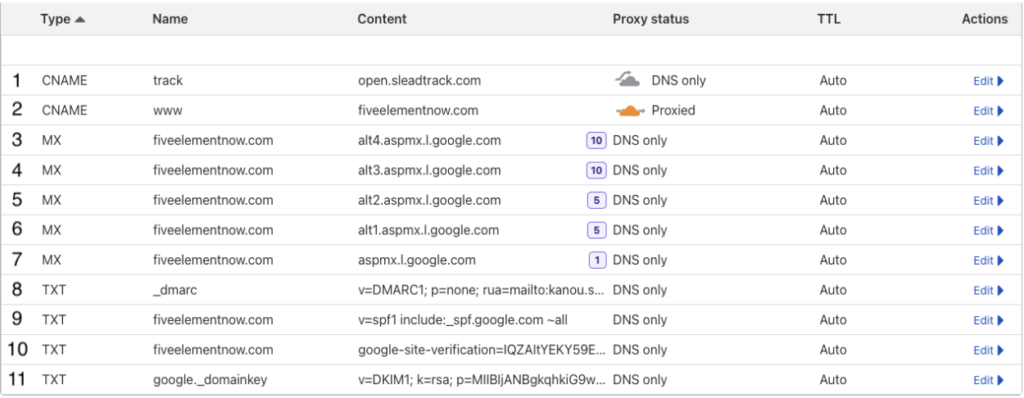
The following DNS setup is for Google Workspace only. If you are using Microsoft 365 or another email provider, the setup will be slightly different. The final setup will look like the screenshot below, but we will configure each step together.


Your DNS settings should be configured as follows:

1. Tracking Domain

    • Type: CNAME
    • Name: track
    • Content: open.sleadtrack.com
    • Proxy status: DNS only
    • Explanation: This sets up a tracking domain for your email-sending software to monitor opens and clicks.

2. CNAME for WWW

    • Type: CNAME
    • Name: www
    • Content: yourdomain.com
    • Proxy status: Proxied
    • Explanation: This ensures that www.yourdomain.com redirects to yourdomain.com.

3. Mail Exchange Record 1

    • Type: MX
    • Name: yourdomain.com
    • Content: alt4.aspmx.l.google.com
    • Proxy status: DNS only
    • Priority: 10

4. Mail Exchange Record 2

    • Type: MX
    • Name: yourdomain.com
    • Content: alt3.aspmx.l.google.com
    • Proxy status: DNS only
    • Priority: 10

5. Mail Exchange Record 3

    • Type: MX
    • Name: yourdomain.com
    • Content: alt2.aspmx.l.google.com
    • Proxy status: DNS only
    • Priority: 5

6. Mail Exchange Record 4

    • Type: MX
    • Name: yourdomain.com
    • Content: alt1.aspmx.l.google.com
    • Proxy status: DNS only
    • Priority: 5

7. Primary Mail Exchange Record

    • Type: MX
    • Name: yourdomain.com
    • Content: aspmx.l.google.com
    • Proxy status: DNS only
    • Priority: 1

8. DMARC Record

    • Type: TXT
    • Name: _dmarc
    • Content: v=DMARC1; p=none; rua=mailto:yourname@yourdomain.com
    • Proxy status: DNS only
    • Explanation: This sets up DMARC (Domain-based Message Authentication, Reporting, and Conformance) to manage email authentication policies and receive reports. Replace yourname@yourdomain.com with an email address you own for receiving DMARC reports.

9. SPF Record

    • Type: TXT
    • Name: yourdomain.com
    • Content: v=spf1 include:_spf.google.com ~all
    • Proxy status: DNS only
    • Explanation: This is an SPF (Sender Policy Framework) record that allows Google servers to send emails on behalf of your domain.

10. Google Site Verification

    • Type: TXT
    • Name: yourdomain.com
    • Content: google-site-verification=(your verification code)
    • Proxy status: DNS only
    • Explanation: This is a Google site verification record used to verify domain ownership for Google services. When you created your Google Workspace, this was one of the steps. Google guided you through this, so it should already be set up.

11. DKIM Record

    • Type: TXT
    • Name: google._domainkey
    • Content: v=DKIM1; k=rsa; p=(your DKIM key)
    • Proxy status: DNS onlyExplanation: This is a DKIM (DomainKeys Identified Mail) record that adds a digital signature to your emails to verify that they haven’t been altered.
      In your Google Admin, type DKIM in the search bar and click on the first result: ‘DKIM authentication’. Add the record that is shown and click on Start Authentication.


Now we need to set up the email sending software. We recommend using Smartlead as it’s currently the best tool for cold emailing.


    1. Create an Account. Sign up for Smartlead and add your 36 email addresses. They provide guides on how to do this in bulk, but you can also add them one by one. If you’re using a reseller, he will do it for you.
    1. Configure your Email Addresses. Select all your email addresses and click on ‘Bulk Update’. Configure the following settings:
    • General Settings:
        • Messages per day: 35 to 40
        • Signature: Add your signature
        • Custom Tracking Domain: track.yourdomain.com (replace yourdomain.com with your actual domain). The DNS record has been added earlier in the DNS setup.

    • Warm Up:
        • Bulk Update Warm-up Status: Active
        • Total Number of Warm-up Emails per Day: 20-30
        • Bulk Update Daily Ramp-up: 2
        • Reply Rate: 35%
        • Custom Warm-up Identifier Tag: (choose a tag)
        • Bulk Update Auto-adjust Warm-up/Sending Ratio: Enable

Your email addresses are now warming up. We recommend not sending any emails other than the warm-up emails for 2 weeks. After this period, keep the warm-up activated.

NOTE: We aim to contact 10 new leads per day per email address. To reach 250 new leads per day, you will need to include 25 inboxes in the campaign. In our example, we created 36 inboxes because we always keep 30% of the inboxes in warm-up mode. We rotate every 2 weeks.

After 2 weeks, the inboxes that were in warm-up will be added to the campaign, and we will disconnect 30% of the currently active inboxes, preferably those with decreased reputations.

Happy emailing!😊

_________________

If you have any questions or need further assistance, don’t hesitate to reach out. We are here to help you achieve your goals and transform your outreach efforts. You can book a call using this link – Book a Call


5 Steps to Build a High-Quality Email List for Education Businesses

5 Steps to Build a High-Quality Email List for Education Businesses

List building is arguably the most critical part of the process.

You can have the best offer, the most compelling copy, and perfect deliverability, but if you’re not targeting the right prospects, you won’t achieve meaningful results. Here’s how to ensure you’re contacting the right people.

The list-building process will be divided into 5 parts:


    1. Identify your target audience
    2. Segment your leads
    3. Source your leads
    4. Verify your emails
    5. Waterfall enrichment


Begin by defining who you want to contact. Create a detailed profile of your ideal prospects using the following criteria:

    • Industry: Which sectors are you targeting?
    • Keywords: What terms best describe their business?
    • Company Size: What is the size of the companies you are targeting?
    • Location: Where are these companies located?
    • Job Title: Which roles within these companies are you aiming to reach?
    • Technology: Are there specific technologies they use that would qualify them as leads


Different segments of your audience have different needs and pain points. By segmenting your leads, you can address these specific needs more accurately. Segmenting your leads involves categorizing your leads based on specific criteria to tailor your outreach efforts more effectively. This allows you to create more personalized and relevant messages for each segment, increasing the likelihood of engagement.

Segmentation Criteria:

Industry: Different industries face unique challenges and have specific needs. Create tailored messages that address the particular pain points and benefits relevant to each industry using the same product or service.

Example Message:

For Healthcare: “Hi {{first_name}}, our data analytics software helps healthcare providers improve patient outcomes by offering real-time insights and predictive analytics.”
For Finance: “Hi {{first_name}}, our data analytics software helps financial institutions enhance risk management and optimize investment strategies with advanced data insights.”

Company Size: The size of a company often dictates its resources, decision-making processes, and pain points. Tailor your messaging to reflect the scale of your solution, whether it’s for SMBs or large enterprises.

Example Message:

For Small Businesses: “Hi {{first_name}}, our tool is perfect for small businesses looking to streamline their operations and reduce costs.”
For Large Enterprises: “Hi {{first_name}}, our enterprise solution is designed to handle the complex needs of large organizations, ensuring scalability and efficiency.”

Location: Geographic location affects language preferences, cultural nuances, and time zones. Adjust your campaigns to match the language and optimal sending times for different regions. For example, you might need separate campaigns for the UK and the USA to ensure emails are sent at appropriate times for each timezone.

Job Title: Different roles within a company have varying responsibilities and concerns. Customize your messaging to address the specific priorities and pain points of different job titles.


Example Message:

For CEOs: “Hi {{first_name}}, our software provides comprehensive analytics that can drive strategic decisions and enhance overall business performance.”
For Sales Heads: “Hi {{first_name}}, our software improves sales team productivity by automating lead management and providing real-time performance insights.”


Once you have a clear profile, the next step is to identify the right tools to source these leads. We’ve compiled a document with over 50 tools that can assist in this process. There are 50+ tools depending on what you’re looking for.

Some tools have a good database specifically for e-commerce stores, others for SaaS companies, local businesses, agencies, leads that are on Instagram or Twitter, companies that are raising funds, or those using certain types of technologies, etc. But in 90% of cases, Apollo is the best option for sourcing leads.

Although the specific steps to source leads are straightforward and can be found in numerous YouTube tutorials, here’s a brief overview of the key information you need to export:

    • First Name
    • Last Name
    • Company Name
    • Website
    • Email
    • LinkedIn Profile
    • Company Size
    • Industry


Most leads you export will have their email status marked as either verified or unavailable. Here’s how to handle each scenario:

    • Verified Emails: Even if an email is marked as verified, we recommend an additional layer of verification using tools like Debounce. You can also use any other tool under the category CLEAN LEADS in the document presented earlier. This extra step ensures higher accuracy.
    • You’ll get three types of results:
      – Verified (Safe to Send)
      – Invalid
      – Catch-All
    • Contact leads with Verified emails directly.
    • Remove Invalid emails as they will bounce and harm your deliverability.
    • For Catch-All emails, use another verification tool like Verify Magically or Scrubby
    • Unavailable Emails:
        • If Apollo doesn’t find an email, it doesn’t mean it’s non-existent. Use other tools to check these contacts.
        • In this case, we can use Waterfall Enrichment. This involves using multiple vendors to maximize lead enrichment.
        • This step is optional and mostly needed if your Total Addressable Market (TAM) is small.
        • For larger TAMs, it might not be necessary, as leads are plentiful


Waterfall enrichment involves using multiple vendors to maximize lead enrichment. This can be time-consuming if done manually, so we recommend tools like BetterContact or Clay that automate this process.

  • BetterContact: Easier to use for those new to waterfall enrichment.
  • Clay: More advanced

Building a high-quality email list is a crucial step for education businesses to effectively reach their target audience and achieve meaningful results. By identifying your target audience, segmenting your leads, sourcing reliable leads, verifying emails, and utilizing waterfall enrichment, you can ensure that your outreach efforts are precise and impactful.

Each step of this process enhances the quality of your list, allowing for more personalized and relevant communication that drives engagement and conversion. Implementing these strategies will position your education business for success, fostering stronger connections with the right prospects and ultimately achieving your marketing goals.


Happy emailing!😊
_________________

If you have any questions or need further assistance, don’t hesitate to reach out. We are here to help you achieve your goals and transform your outreach efforts. You can book a call using this link – Book a Call